Building your own CNC plasma cutter can be an incredibly rewarding endeavor, allowing you to create intricate designs with precision while saving money compared to purchasing a pre-built machine. Whether you’re a seasoned fabricator looking to enhance your workshop capabilities or a hobbyist eager to dive into the world of CNC technology, this complete DIY guide will equip you with the knowledge you need. With a focus on safety and efficiency, you’ll gain insights into selecting the right materials, essential components, and step-by-step assembly techniques. By mastering this process, you’ll not only gain new skills but also unlock endless possibilities for your projects. Ready to transform your creativity into tangible results? Let’s get started!
Choosing the Right CNC Plasma Cutter Design for Your Needs
Selecting the right design for your CNC plasma cutter can significantly impact your project efficiency and the quality of your cuts. With various configurations available, it’s essential to evaluate your specific needs, such as the type of materials you’ll be cutting, the complexity of the designs, and your budget constraints. The most common designs include gantry-style and vertically mounted systems. Gantry-style plasma cutters provide stability and the capability to handle larger sheets of material, making them ideal for commercial applications. Conversely, vertical systems are often more compact and suitable for smaller workspaces, yet they may have limitations on the material size they can accommodate.
To determine the best fit, consider the following factors:
- Material Thickness: Assess the thickness of materials you’ll primarily work with. Some machines are optimized for thin sheets, while others handle thicker materials.
- Cut Complexity: If intricate designs are your goal, ensure your system can achieve precise, detailed slices without losing quality.
- Budget: Determine how much you’re willing to invest, including both initial costs and potential upgrades for enhanced performance.
- Workspace: Evaluate the size of your workshop as it dictates the cutter dimensions and configuration that will work best.
Furthermore, understanding the technology behind CNC plasma cutting can guide you in selecting features that align with your projects. For instance, machines equipped with better drive systems and control software offer improved accuracy. Additionally, consider the types of plasma cutters that are compatible with your desired CNC setup. Research models that provide a seamless integration to ensure efficient workflow and minimize time spent on setup and adjustments. By carefully evaluating these factors, you will enhance not only the quality of your cutting but also the overall productivity of your CNC plasma cutter projects.
Essential Components of a DIY CNC Plasma Cutter
A DIY CNC plasma cutter brings creativity and precision to metalworking, enabling users to realize intricate designs with remarkable accuracy. Behind the effective operation of these machines are several essential components that work in harmony. Understanding these parts not only aids in building a high-performance cutter but also ensures that it meets specific project requirements.
The core of a CNC plasma cutter is the plasma torch, which generates the high-temperature plasma arc necessary for cutting through various metals. Selecting a torch compatible with your desired material thickness is crucial; for instance, a torch that can handle thicker materials may be necessary for industrial applications. Next, consider the CNC control software; this dictates how the cutter interprets design files and manages the movement of the torch. Look for software that supports formats like DXF or SVG and offers customizable cutting paths for more complex cuts.
Another vital component is the gantry system or frame, which provides the structure that supports the plasma torch. A robust and stable gantry helps minimize vibration and ensures accuracy during operation. Coupled with this is the drive system, often utilizing servo or stepper motors, which allow precise movement of the torch across the material. This element is critical for achieving high-quality cuts without unnecessary deviations.
Lastly, the power supply unit (PSU) should not be overlooked-it powers the plasma torch and significantly influences cutting capability and efficiency. A suitable PSU should match both the operational requirements of the chosen torch and the material thickness you’ll typically work with. Collectively, these components form the backbone of a DIY CNC plasma cutter, enabling users to transform ideas into beautiful, functional metal designs.
Step-by-Step Guide to Assembling Your CNC Plasma Cutter

Assembling a CNC plasma cutter can transform your metalworking capabilities and enable you to create intricate designs with precision. Understanding the assembly process is crucial for achieving effective results and ensuring safety throughout the build. Below is a step-by-step guide designed to help you through this journey, from gathering materials to final assembly.
Begin by gathering all necessary components and tools. This includes your plasma torch, gantry system, power supply unit (PSU), CNC control software, wiring, and various mechanical parts such as rails, brackets, and screws. A well-organized workspace will make the assembly process smoother. Ensure you have basic tools such as a drill, wrenches, and a multimeter for electrical connections. Prior to assembly, reviewing the circuit diagrams for your plasma cutter’s electrical components can prevent future complications.
Frame and Gantry Assembly
Start with the assembly of the frame and gantry, which serves as the foundation for the plasma cutter. Follow these key steps:
- Assemble the Base: Construct the base of the cutter using robust materials like steel to ensure stability. The dimensions will vary based on the cutting area you anticipate needing.
- Install the Gantry: The gantry should be mounted securely on the vertical supports of the base. Make sure it moves freely along the rails without any obstruction.
- Attach the Motors: Position and secure the stepper or servo motors to the gantry. These will control the movement of the torch, so ensure they are aligned properly for accurate cutting.
Electrical Connections
Next, make the necessary electrical connections. This involves wiring the PSU to the plasma torch and connecting the CNC control board. Use quality connectors to ensure reliability and safety:
- Wire the PSU: Connect the power supply to the plasma torch, ensuring that voltage and amperage ratings are appropriate for your chosen system.
- Connect the Control Board: Follow the manufacturer’s instructions to wire the motors and switches to the CNC control board. This is critical for effective operation.
- Test Circuits: Before finalizing the assembly, use a multimeter to ensure all connections are correct and there are no shorts.
Software Installation and Configuration
Once the hardware is in place, install and configure your CNC control software. This software interprets your design files and manages the torch’s movement:
- Install Software: Follow the installation guide specific to your software. Ensure it recognizes your hardware.
- Set Parameters: Configure cutting speeds, torch height, and material types to optimize your cutting quality.
Testing and Calibration
Before you conduct your first cut, a thorough testing and calibration process is necessary:
- Calibration: Run initial diagnostic tests to calibrate the movements of the gantry and torch. Fine-tuning responsiveness will result in better cuts.
- Sample Cutting: Perform a test cut on scrap material. Adjust parameters as needed based on the quality of the cut.
By following these detailed steps, you will systematically assemble a functional CNC plasma cutter tailored to your needs, while ensuring safety and efficiency throughout the process. Always prioritize safety protocols when working with electrical components and high temperatures to protect both yourself and your workspace.
Key Software and Control Systems for CNC Plasma Cutters

The success of any CNC plasma cutter relies heavily on the software and control systems that orchestrate its operation. This technology translates design files into actionable commands that dictate the movement of the plasma torch, crucial for achieving precise and clean cuts. A well-chosen software suite not only improves efficiency but also enhances the overall quality of your work.
When selecting CNC software, look for solutions that are compatible with your hardware and allow for a high level of customization. Popular options include SheetCam, Fusion 360, and Mach3. Each of these programs has unique features that cater to different stages of the cutting process. For instance, SheetCam specializes in nesting and optimizing cutting paths, while Fusion 360 offers a comprehensive design and simulation environment, making it easier to visualize the final outcome before cutting begins.
Control Systems play a pivotal role in the interaction between software and hardware. These systems manage the stepper or servo motors responsible for the torch’s movement along the X, Y, and Z axes. Choosing a reliable motion control system, such as GRBL or LinuxCNC, is essential for achieving precise cutting operations. These controls can often be tuned to provide better performance through adjustments in acceleration, speed, and responsiveness, resulting in cleaner cuts and improved material utilization.
To ensure the best performance from your CNC plasma cutter, integrate reliable communication protocols between your software and control systems. Common protocols include USB, serial communication, or Ethernet, which facilitate seamless data transfer. Regularly updating your software and firmware can also help prevent compatibility issues and enhance functionality, allowing you to take full advantage of the technological advancements in the industry.
In summary, prioritizing robust software and an effective control system will greatly enhance the capabilities of your CNC plasma cutter, leading to better precision, reliability, and efficiency in your cutting tasks.
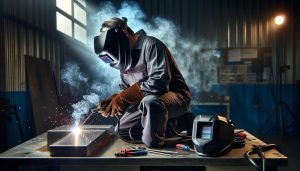
Safety Protocols for Operating a CNC Plasma Cutter

Operating a CNC plasma cutter presents a unique set of challenges and risks, making comprehensive safety protocols crucial for anyone engaging in this activity. One of the primary hazards stems from the high temperatures generated during the cutting process, which can result in serious burns. Proper protective gear is essential. Always wear flame-resistant clothing, constructed from materials such as Nomex or Kevlar, along with a pair of durable leather gloves. Eye protection is non-negotiable; a quality welding helmet with appropriate shade will safeguard against harmful ultraviolet light and flying debris.
Before commencing any cutting operations, ensure that your workspace is organized and free of flammable materials. This includes clearing away any solvents, papers, or debris that may ignite from sparks. Additionally, maintain proper ventilation in your environment. Plasma cutting generates harmful fumes and gases, so using a local exhaust ventilation system or working in a well-ventilated area helps mitigate respiratory risks. It’s also advisable to have a fire extinguisher rated for Class A, B, and C fires readily accessible near your work area.
Regular maintenance of the plasma cutter itself can prevent malfunctions that may lead to accidents. Conduct periodic inspections of all electrical connections and hoses for signs of wear or damage. Ensure that the air supply is free from contaminants such as moisture and oil, which can not only affect cutting quality but also pose safety risks. Be familiar with your machine’s emergency shutoff procedures so you can quickly respond if something goes awry.
Finally, before starting the CNC plasma cutter, review the operation manual and safety guidelines specific to your equipment. Training should not be overlooked; for those new to CNC plasma cutting, investing time in safety courses or workshops can significantly increase your proficiency and safety awareness. By adhering to these protocols, you ensure not only a safer work environment but also a more enjoyable and efficient cutting experience.
Troubleshooting Common Issues with DIY Plasma Cutters
Operating a DIY CNC plasma cutter can sometimes feel like solving a complex puzzle, especially when issues arise that hinder performance. Whether you’re encountering inconsistent cutting speeds, excessive dross, or unexpected shutdowns, troubleshooting these common problems can lead to more efficient operations and better results. Understanding your plasma cutter’s components and their functions is crucial, as many issues can be traced back to either the settings or the hardware itself.
One common issue is inconsistent arc stability, which often manifests during cross movements. This can be due to several factors including improper settings on your plasma cutter or inadequate air pressure. Make sure to check the cutting speed, torch height, and the air compressor’s pressure settings. Ideally, the air pressure should be maintained according to the manufacturer’s recommendations, typically around 60-80 PSI for most plasma cutters. If the arc stabilizes but still fluctuates during cutting, inspect the consumables (the nozzle and electrode) for wear and replace them if necessary.
Excessive dross on the underside of cuts is another frustration that can arise during CNC plasma operations. Dross can result from too slow a cutting speed or too low plasma power, or it might indicate the need for an increase in torch height. To minimize dross, you can adjust the feed rate and ensure that the nozzle remains at the optimal height above the workpiece during the cut. Additionally, consider switching to a different cutting technique or adjusting the pulse width and frequency in your control software, if applicable.
In cases where the cutter unexpectedly shuts down, the cause could range from overheating to electronic malfunctions. Regular maintenance checks are essential; ensure that dust and debris are cleared from the unit. Additionally, the connections and wiring should be inspected for any signs of wear or damage. If the problem persists, consult your machine’s manual to identify any error codes showing during a shutdown, which often provide clues for diagnosing the issue.
Lastly, for those new to CNC plasma cutting, familiarizing yourself with the software control settings can also alleviate many problems. Programmable settings can sometimes inadvertently lead to issues such as improper cutting paths or incorrect speeds. Reviewing your toolpath in the software before initiating a cut can save you time and materials. Engaging with community forums or consulting experienced users can provide valuable insights and solutions, enhancing your troubleshooting capabilities further.
By keeping these common issues in mind and employing proactive maintenance and adjustment strategies, you can significantly enhance the performance and longevity of your DIY CNC plasma cutter, leading to cleaner cuts and greater overall satisfaction.
Advanced Techniques for Precision Cutting with CNC Plasma
Achieving precision cutting with a CNC plasma cutter requires a blend of technical know-how, proper settings, and advanced techniques that maximize both efficiency and quality. One essential technique is the optimization of cutting speed and height to suit the material being processed. For instance, thinner materials benefit from faster speeds and lower torch heights, leading to cleaner cuts and less dross. Conversely, when working with thicker materials, adjusting these parameters can enhance the cut quality and ensure that the arc remains stable throughout the process.
To elevate the precision of your cuts further, consider implementing advanced software features available in your CNC control systems. Many modern plasma cutting machines come equipped with capabilities to optimize cut paths and adjust parameters automatically based on material thickness and type. Features like kerf compensation allow you to account for the width of the plasma cut, resulting in more accurately dimensioned parts. Ensuring that your software settings are correctly calibrated not only improves precision but also reduces waste-an essential aspect of efficient plasma cutting.
Material selection also plays a critical role in achieving precision. Different materials, such as aluminum, mild steel, or stainless steel, require specific settings for effective cutting. It’s beneficial to maintain a material database within your software settings, detailing the optimal parameters for various materials. This reference allows for quicker adjustments and ensures repeatability when cutting similar components.
Another advanced technique involves controlling the plasma arc and gas flow more meticulously. Adjusting the plasma gas flow rate can help stabilize the arc and improve cut quality. This becomes particularly important when working with intricate designs or when fine detailing is required.
Lastly, regularly maintaining and calibrating your CNC plasma cutter is paramount to achieving precision. Routine checks on alignment, consumable wear, and cleaning help ensure that your cutter operates at peak performance. Keeping an eye on wear patterns of consumables can pre-empt issues that would lead to diminished cut quality, ensuring that every project maintains the well-defined edges and precision cuts that CNC plasma cutting is known for.
Upgrading Your CNC Plasma Cutter for Enhanced Performance
To achieve optimal performance from your CNC plasma cutter, various upgrades can be strategically implemented to improve efficiency, precision, and functionality. These enhancements are essential, especially for users looking to elevate their cutting capabilities or exploring more complex projects.
One of the most impactful upgrades is incorporating a high-quality torch designed for specific cutting needs. Opting for a torch that includes features like automatic height adjustment can significantly improve cut quality by maintaining the optimal distance from the material, thereby ensuring a stable arc. Additionally, investing in advanced consumables like hypermilling tips or fine-cut nozzles can enhance the cutter’s ability to handle intricate details while producing minimal dross.
Software and Control Systems
Integrating sophisticated software and control systems can also enhance your CNC plasma cutter’s performance. Upgrading to a control system that supports advanced path optimization and cutting parameter adjustments based on material thickness can lead to remarkable improvements in accuracy. Features such as real-time monitoring of the cutting process allow for automatic adjustments, helping mitigate errors and enhancing safety during operation.
Motion Control and Stability
Another significant upgrade involves enhancing the motion control system. By upgrading to ball screw drives or better linear guides, you can ensure smoother movement, which enhances the overall cut precision. Adding a stepping motor or servo motor system can also improve the cutter’s response and adaptability during intricate cutting operations, making the machine more responsive to changes in material positioning or thickness.
Cooling Systems and Air Quality
Effective cooling systems are crucial for maintaining the longevity and performance of your plasma cutter. Implementing a dedicated air filtration system can reduce the ingested particles that could interfere with performance and prolong the life of consumables. Additionally, cooling equipment for the plasma torch can help manage temperature during extensive cutting operations, mitigating the risk of overheating that can lead to damaged components or compromised quality.
By investing in these upgrades, users can dramatically enhance their CNC plasma cutter’s cutting capabilities, achieving superior results in both precision and efficiency. Regular assessments of equipment performance and timely upgrades are vital for sustaining high-quality output in any metalworking project.
Maintenance Tips to Extend the Life of Your CNC Plasma Cutter
Regular maintenance is crucial for prolonging the lifespan and ensuring the optimal performance of a CNC plasma cutter. Neglecting routine care could lead to costly repairs or even the need for a complete replacement. To keep your equipment in peak condition, it’s essential to follow a structured maintenance routine that addresses common wear and tear associated with intense cutting operations.
One of the most vital components to check regularly is the torch and consumables. Regularly inspect the nozzle, electrode, and diffuser for wear and replace them as needed to prevent poor cut quality. Dross build-up around the cutting area can also lead to inaccuracies; routinely cleaning these areas, along with the worktable, ensures optimal cutting conditions. Additionally, ensure the torch height is correctly set before each session to maintain a steady arc and quality cuts.
Keeping the air supply clean is another critical maintenance aspect. Moisture and debris in the air supply can hinder cutting performance and lead to premature wear on consumables. Installing an air dryer and filters can mitigate this risk significantly. Furthermore, ensure that your CNC plasma cutter’s electrical connections remain intact and free from corrosion. Regularly inspect wires and connectors, tightening loose connections and replacing damaged ones to maintain effective operation.
Regularly consult the manufacturer’s guidelines for specific maintenance schedules and requirements tailored to your make and model. Creating a maintenance log can also help in tracking the condition of your plasma cutter over time, making it easier to identify patterns and anticipate necessary repairs before they escalate into significant issues. By proactively managing the upkeep of your CNC plasma cutter, you not only extend its operational life but also enhance its reliability and efficiency in producing precise cuts.
Cost Breakdown: Building vs. Buying a CNC Plasma Cutter
When deciding between building or buying a CNC plasma cutter, it’s essential to consider both the financial investment and the practical benefits of each option. A built-to-order CNC plasma cutter can be tailored specifically to your needs, potentially providing advanced features that might be absent from commercially available machines. However, the time, technical expertise, and initial costs associated with DIY projects can deter many individuals from this route.
For those contemplating the DIY route, the costs can vary dramatically based on the components chosen. Here’s a breakdown of potential expenses involved in a DIY CNC plasma cutter build:
- Frame and Motion System: $200 – $1,000 (materials like aluminum or steel, stepper motors, and linear motion components)
- Plasma Cutter Unit: $400 – $1,500 (depending on whether you opt for a lower-end or a more advanced model)
- Control Electronics: $150 – $600 (including a computer, software, and control board)
- Miscellaneous Components: $100 – $300 (wiring, connectors, plasma torch, safety gear)
This brings a DIY total to approximately $950 – $3,400, depending on the sophistication of your setup.
On the other hand, purchasing a pre-made CNC plasma cutter can be substantially easier and faster, but it typically comes at a higher cost. Prices for ready-made machines generally start around $1,000 for entry-level models and can exceed $500,000 for industrial-grade systems with advanced features and capabilities [[3](https://hy-proto.com/cnc-plasma-cutter-price)]. Factors to consider include warranty support, service options, and the availability of replacement parts, all of which can add value to the purchase despite the higher upfront cost.
Ultimately, your decision will hinge on individual needs, skills, and budget. If you possess engineering skills and the ambition to customize your machine, a DIY approach can yield a unique tool tailored precisely to your specifications. Conversely, if you need a reliable machine without the commitment of a build project, investing in a commercially available CNC plasma cutter may be the most prudent choice.
Community Resources and Support for DIY CNC Plasma Projects
Building a CNC plasma cutter can feel daunting, yet numerous community resources and support systems exist to guide newcomers and seasoned DIY enthusiasts alike. Engaging with these platforms can significantly enhance your knowledge, skills, and confidence. Online forums, social media groups, and dedicated websites created by fellow hobbyists and professionals offer a wealth of information, from troubleshooting tips to design inspiration.
Joining specialized forums, such as the Langmuir Systems Forum, allows you to connect directly with other builders. There, you can find discussions on various topics, including component selection and assembly strategies. Members often share their experiences, post photos of their projects, and provide troubleshooting assistance, creating a collaborative learning environment. Additionally, reviewing threads that focus on specific machines or tools can help you narrow down critical decisions, ensuring you choose components that best suit your needs.
Moreover, YouTube serves as an invaluable resource for visual learners. Many creators document their CNC plasma cutter builds, offering tutorials that break down complex processes into manageable steps. Watching these builds can provide clarity on wiring, assembly, and software setup. Many channels also provide reviews on plasma cutters and accessories, which can aid in making informed purchasing decisions.
Engaging with local maker spaces or welding workshops can also provide hands-on experience and mentorship. These spaces often have experienced members willing to share their expertise or assist in projects, acting as a live collaborative resource. Participating in workshops not only hones your skills but also helps establish a network that can be invaluable for support and advice as your CNC plasma cutter journey progresses.
In summary, tapping into organized community resources, both online and offline, can dramatically decrease the learning curve associated with building and operating a CNC plasma cutter. By leveraging the collective knowledge and experience of others, you can enhance your project outcomes while fostering relationships within the maker community.
Faq
Q: What materials can I use for my DIY CNC plasma cutter frame?
A: For a DIY CNC plasma cutter frame, consider using sturdy materials like steel or aluminum for durability. Steel offers strength and resistance to warping, while aluminum is lighter and easier to work with. Ensure the frame is rigid to maintain cutting precision.
Q: How do I choose the right plasma cutter for my CNC project?
A: To choose the right plasma cutter for your CNC project, consider factors like cutting capacity, material thickness, and power supply (120V or 240V). Also, look for models with a fine-cut capability if you plan on working with detailed designs. Ensure compatibility with your CNC system.
Q: Can I use a handheld plasma cutter with my CNC setup?
A: Yes, you can use a handheld plasma cutter with your CNC setup by building a mounting system that allows it to be attached to the CNC frame. However, ensure it has the necessary automation features and adjustability to synchronize with your cutting paths.
Q: What software is best for programming a CNC plasma cutter?
A: For programming a CNC plasma cutter, popular software options include Mach3 for motion control, Fusion 360 for design files, and SheetCam for nesting and generating toolpaths. Ensure the software is compatible with your CNC hardware and provides adequate support for your designs.
Q: How do I prevent metal warping during CNC plasma cutting?
A: To prevent metal warping during CNC plasma cutting, use appropriate cut speeds and maintain a consistent cutting temperature. Additionally, consider cutting thin materials in a specific order to distribute heat evenly and avoid concentrated heating in one area.
Q: What are common mistakes when building a CNC plasma cutter?
A: Common mistakes when building a CNC plasma cutter include poor frame alignment, inadequate power supply selection, and insufficient cooling for the plasma cutter. Ensure precise measurements during assembly and choose components that suit your anticipated workload to prevent issues.
Q: How can I enhance the accuracy of my DIY CNC plasma cutter?
A: To enhance accuracy, ensure your CNC plasma cutter has a well-aligned gantry and utilize precise stepper motors. Incorporating a THC (Torch Height Control) system can also help maintain a consistent torch height, which is crucial for achieving clean cuts.
Q: What safety gear is necessary for operating a CNC plasma cutter?
A: Necessary safety gear includes a welding helmet with appropriate filters, gloves resistant to heat and cuts, and protective clothing made from flame-resistant materials. Ensure your workspace is well-ventilated to avoid harmful fumes and always follow manufacturer safety guidelines.
Final Thoughts
Congratulations on taking the first steps towards building your very own CNC plasma cutter! By harnessing the techniques outlined in this guide, you’re well-equipped to create precision cuts that rival professional setups. Don’t forget to explore our article on advanced plasma cutting techniques to elevate your skills even further, or check out our safety protocols to ensure you’re cutting with confidence.
As you dive into your project, remember that each cut is a new opportunity to refine your skills. If you face challenges or have questions, engage with our community in the comments below-learning from peers can make all the difference. Ready to take your welding to the next level? Subscribe to our newsletter for the latest tips and exclusive resources, ensuring you never miss out on valuable insights.
Your journey into the world of CNC plasma cutting doesn’t end here; keep exploring and transforming your ideas into reality. Together, let’s make amazing projects come to life!